
So last winter, Michael and I decided that if I ever had to have surgery for the tumor around my optic nerve, that before surgery, we would take a trip together as a couple and then a trip as a family somewhere. Just to have some good family time before a major surgery. We just didn't realize that when I went in for an appointment with the neurosurgeon, that they would want to do the craniotomy less than a week later, so we had no time to plan for anything. So, Michael told me that after surgery, being laid up for 6-8 weeks, I could spend time planning for a little getaway for our anniversary for the two of us in August. As our first big anniversary trip celebrating 13 years of marriage and celebrating making it through some difficult years and a major surgery. Originally, we planned to go to Sanibel Island, which is just an hour away, but due to the horrible red tide issues this year, I had to change our plans and began researching other areas to "get away", but were still in Florida. That's when I found Dry Tortugas. After a lot of research and google-ing, we made our plans and went and had the absolute best time of our lives! It's something I won't hesitate to recommend to anyone and because of our experience, many others have had so many questions and are asking for tips and advice, so I figured it'd be best to just write a blog post about our experience! Here we go!
What are the Dry Tortugas? The Dry Tortugas are a small group of islands, located in the Gulf of Mexico at the end of the Florida Keys, United States, about 67 miles west of Key West, and 37 miles west of the Marquesas Keys, the closest islands. Many people don't know that it even exists - I didn't!
There are two ways to get there: a ferry or by sea plane. Neither are cheap, but taking the ferry is definitely the most inexpensive option. It cost us $185 per person for the ferry ticket, plus $15 fee for the National Park. But - that also includes breakfast, lunch, a tour of the fort, and snorkel gear. So overall, it's not too bad. The ferry takes about 2-2.5 hours to get to the Fort Jefferson Dry Tortugas National Park and you get to spend about 4-5 hours there on an entire secluded beach that also has Fort Jefferson - a fort that was used during the Civil War era. It has remarkable history! You leave the island around 2:30-3:00.
So, while you can certainly take a day trip there and enjoy several hours on a secluded beach with about 150 other day trippers, we opted for something else... Camping! It cost just an extra $15/night to camp. We figured, if we've already paid all that to get there, why not pay another $30 to stay for 2 nights? And we are SO glad we did! Once the day trippers leave - you end up being just one/two of 10+ people on the island. The first night, we were there with 10 other campers. The second night we were there with 7 other campers. It's cool to go to a secluded island that you have to share with only 150 people, but it's even cooler to stay overnight on an island with a very small amount of other people!
So... How does it all work? What tips do we have? I'm so glad you asked!
To book, I suggest doing it WAY in advance. They book up quickly, sometimes months in advance, depending on the time of year you want to camp! We camped in September, which is a slower month. They only have 10 campsites, so they will only allow 10 groups of campers, which is why it gets booked up quickly. To book, call Yankee Freedom, which is the ferry you would be riding on. Their number is: 1-800-634-0939 .
Now, keep in mind... When you're camping at the Dry Tortugas... It is PRIMITIVE camping. There are no showers. There are composting toilets, but that's it. You have to bring your own food, your own water (for cooking and cleaning and drinking!), and all your camp gear. The campsites provide a picnic table and a charcoal grill. You have to bring your own charcoal (Propane containers or any other form of liquid or gas fuels are not allowed. For safety reasons self-starting charcoal or Sterno cans are the only form of fuel allowed) for cooking.
Camping for 2 days when the highs are in the high 80's and lows in the low 80's leave you pretty stinky and sweaty... But being able to dip into the ocean to cool and "rinse off" helped a lot. The ferry comes back each day, in which you are allowed to get back on enjoy AC if you want, along with coffee. They also have fresh water showers that you're able to rinse off with - which we did each day. No soaps are allowed, but it's a good way to get some of the sticky salt water/sweat off.
If you camp, you MUST be at the Yankee Freedom boarding site in Key West by 6:00am. ALL your gear must be packed onto the ferry by 6:30am. It is SO helpful if all your gear is in STURDY plastic tote bins and hard coolers. We took 2 large plastic totes along with a duffle bag, 2 backpacks and a cooler. If we do it again, I'd put EVERYTHING into totes, instead of backpacks and totes. It's so much handier, and it's waterproof if it rains. We got a thunderstorm our first night, which was kinda scary hearing all the lightning and wondering how everything would hold up. But, we survived and everything ended up being fine and we didn't get struck by lightning! ;)
To get your gear onto the ferry and off the ferry and to the campsite, they provide large wheelbarrows in Key West and on the island that you can use to stick all your stuff in. It makes it super easy to haul your stuff!
Make sure that you have your nightly camping fees in exact cash to pay when you get to the island. When you first get to the island, they will release all day trippers and keep all the campers on the ferry to have a meeting with one of the park rangers. He will go over all the rules and answer any questions you may have. After that, they will release you to get all your gear, which will have already been unloaded onto the dock. Most people will go and get their gear first. Our recommendation is to go and claim a good campsite first. Then get your gear. Like I said above, there are 10 campsites. We got a pretty good one that was secluded and tucked away under some trees. We thought this was great during the day. The downfall was at night, it was hot and we didn't have a lot of airflow. If you really need/want air flow at night, you might opt for a campsite more out in the open, especially where you'd get a good breeze. Below is a map of the island. I added an area in yellow and black that says "CAMPING AREA". These are where the campsites are. The part above the "AREA" would be the area where you'd get the nice sea breeze. Our campsite was right about where the "N" was.


After you get your campsite all set up and organized, now you can go and explore! Don't rush to go do anything. Honestly, we took our time setting up camp and then ate lunch there in our campsite and then ventured out. We swam and snorkeled for a bit and decided to wait to check out the Fort once everyone left. By about 2:30, we had the entire island to ourselves and went and explored the Fort. It's eerily cool to see and explore a HUGE civil war era fort and be the only ones in there. We learned so much history, which was super fun for Michael. He's a huge history buff and loves stuff like that. It was still pretty warm so we decided to snorkel a bit more before supper. We saw so many beautiful fish and coral. The water is SO crystal clear even far out from the land.


For our gear, we brought a tent, an air mattress, 2 battery operated fans (which were a HUGE blessing in 83 degree nights in a tent with little air flow that we got at Walmart HERE. They worked okay for our little tent), cast iron skillet and cast iron dutch oven, camera, GoPro, water bottles, plasticware, and paper plates and bowls, mugs, sheet, blanket and two camp chairs. You don't have to bring your own snorkeling gear, as the ferry provides it for you and you can keep it until you leave the island!
For food, we brought a lot of different items. We brought things like bread and peanut butter, bananas, instant oatmeal packets, granola bars, hot chocolate mix, instant coffee and boxed meals like organic mac n cheese or canned soups. For our first dinner, I made burrito bowls made with boxed yellow rice, a can of black beans, a can of corn, taco seasoning, and then we topped with corn chips and also had tortillas that we could make burritos out of the mixture with. It was delicious, filling, and super easy to make!


And of course we brought stuff for s'mores... How can you camp without one of these??

At night it is SUPER important to make sure ALL food is locked up into the plastic totes and put on top of the picnic table. There are rats on the island that come out at night to look for food. We never saw any or had any issues, but some camp mates at a different camp site said they saw a few, but they looked like cute mice, not like the stereotypical giant rats... As long as your food is put up in the hard totes or coolers, you won't have any issues at all.
Make sure you're out on the beach or on top of the fort for the sunsets. They're beautiful and worth the time to just sit and unwind and relax while watching God's gorgeous creation.


One thing I HIGHLY recommend is to go walk at 3-4am and even grab a blanket and go lay on the helicopter pad and watch the stars. It is AMAZING!!!!! We actually slept there on our second night because it was so much cooler out there in the open. Did I mention that there are NO mosquitoes there? Living in Florida, mosquitoes this time of year or just horrible, so to be on an island and be able to enjoy beautiful views of the stars and not get eaten alive is worth all the money we spent! ;) (Be sure to bring flashlights, but you can only use red lights on the beach during certain times of the year because of turtle nests).


You haven't seen stars until you've seen stars here.... WOW!
You may be able to even see some amazing storms from a distance!


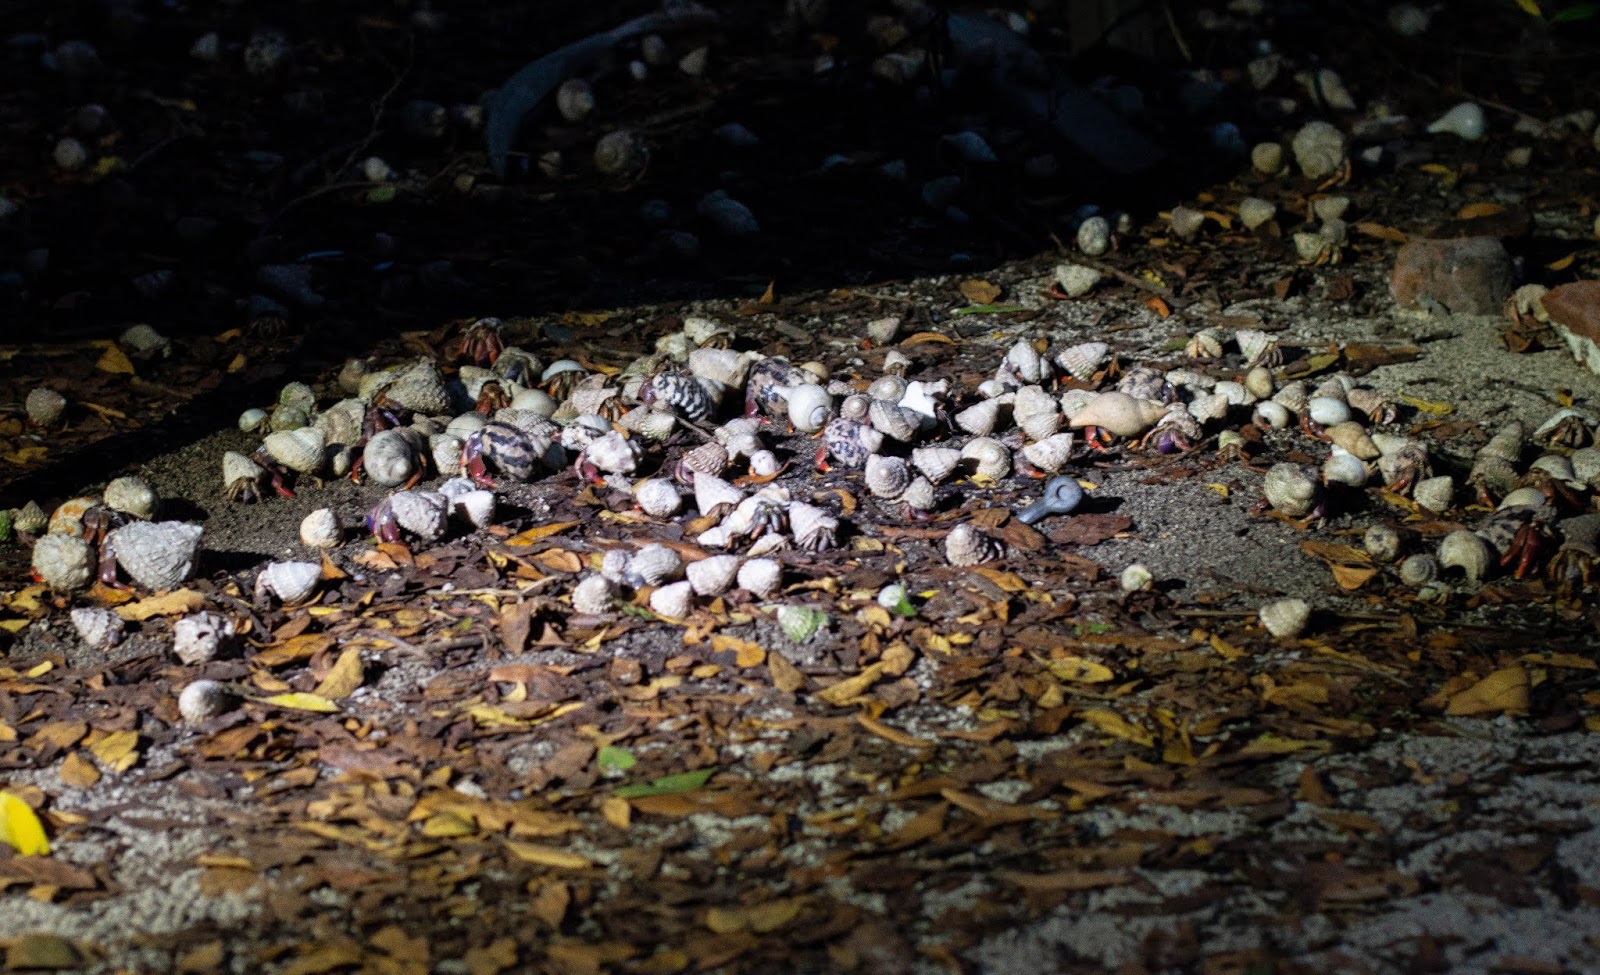
Oh, and don't be afraid when you get to your campsite and see a bunch of these:

Hermit crabs galore! They are ALL over the island - so watch your feet when you walk, especially at night - we stepped on a couple and cracked their poor homes. :(
And while you're up, you might as well watch the sunrise...


The next morning, you'll still have plenty of time before the next wave of day trippers. We got a good snorkel in and walked around the fort again.
When all the day trippers got there, we went back to our campsite and sat and read for a bit, but as the temperature rose, we decided to find a cooler place. That's when we found a great area in the fort on the second floor where there was a great cross breeze. This became our "secret" place where we would get away and enjoy a cool breeze and we'd sit and read for a couple hours while enjoying the view and sounds of the ocean, while also not being in the sun constantly!
 I mean, seriously... Does it get any better than this?
When it's time for your camping trip to end, it's important to have all your gear packed up and ready to go on the dock by 10am the day of your departure. With your ferry ticket, like I said before, you get a free breakfast and free lunch. I suggest you save the free lunch for the day of your departure. All your food will be packed up and stowed away on the ferry. Breakfast consists of fruit, yogurt, cereal, cheese, ham, hard boiled eggs, juice, etc. Lunch is sandwiches (lunch meats and cheeses, PBJ, tuna salad), macaroni salad, chips, fruit, veggies, cookies, and drinks.
By the third day, we were definitely ready for a nice bed, AC and a hot shower, but this trip was one of those things that we will never regret and never forget. I would definitely do it again and I would recommend anyone try it at LEAST for one night!!
For a camping checklist from the Yankee Freedom ferry, go HERE.
For other camping info, go HERE, HERE, and HERE
What are the Dry Tortugas? The Dry Tortugas are a small group of islands, located in the Gulf of Mexico at the end of the Florida Keys, United States, about 67 miles west of Key West, and 37 miles west of the Marquesas Keys, the closest islands. Many people don't know that it even exists - I didn't!
There are two ways to get there: a ferry or by sea plane. Neither are cheap, but taking the ferry is definitely the most inexpensive option. It cost us $185 per person for the ferry ticket, plus $15 fee for the National Park. But - that also includes breakfast, lunch, a tour of the fort, and snorkel gear. So overall, it's not too bad. The ferry takes about 2-2.5 hours to get to the Fort Jefferson Dry Tortugas National Park and you get to spend about 4-5 hours there on an entire secluded beach that also has Fort Jefferson - a fort that was used during the Civil War era. It has remarkable history! You leave the island around 2:30-3:00.
So, while you can certainly take a day trip there and enjoy several hours on a secluded beach with about 150 other day trippers, we opted for something else... Camping! It cost just an extra $15/night to camp. We figured, if we've already paid all that to get there, why not pay another $30 to stay for 2 nights? And we are SO glad we did! Once the day trippers leave - you end up being just one/two of 10+ people on the island. The first night, we were there with 10 other campers. The second night we were there with 7 other campers. It's cool to go to a secluded island that you have to share with only 150 people, but it's even cooler to stay overnight on an island with a very small amount of other people!
So... How does it all work? What tips do we have? I'm so glad you asked!
To book, I suggest doing it WAY in advance. They book up quickly, sometimes months in advance, depending on the time of year you want to camp! We camped in September, which is a slower month. They only have 10 campsites, so they will only allow 10 groups of campers, which is why it gets booked up quickly. To book, call Yankee Freedom, which is the ferry you would be riding on. Their number is: 1-800-634-0939 .
Now, keep in mind... When you're camping at the Dry Tortugas... It is PRIMITIVE camping. There are no showers. There are composting toilets, but that's it. You have to bring your own food, your own water (for cooking and cleaning and drinking!), and all your camp gear. The campsites provide a picnic table and a charcoal grill. You have to bring your own charcoal (Propane containers or any other form of liquid or gas fuels are not allowed. For safety reasons self-starting charcoal or Sterno cans are the only form of fuel allowed) for cooking.
Camping for 2 days when the highs are in the high 80's and lows in the low 80's leave you pretty stinky and sweaty... But being able to dip into the ocean to cool and "rinse off" helped a lot. The ferry comes back each day, in which you are allowed to get back on enjoy AC if you want, along with coffee. They also have fresh water showers that you're able to rinse off with - which we did each day. No soaps are allowed, but it's a good way to get some of the sticky salt water/sweat off.
If you camp, you MUST be at the Yankee Freedom boarding site in Key West by 6:00am. ALL your gear must be packed onto the ferry by 6:30am. It is SO helpful if all your gear is in STURDY plastic tote bins and hard coolers. We took 2 large plastic totes along with a duffle bag, 2 backpacks and a cooler. If we do it again, I'd put EVERYTHING into totes, instead of backpacks and totes. It's so much handier, and it's waterproof if it rains. We got a thunderstorm our first night, which was kinda scary hearing all the lightning and wondering how everything would hold up. But, we survived and everything ended up being fine and we didn't get struck by lightning! ;)
To get your gear onto the ferry and off the ferry and to the campsite, they provide large wheelbarrows in Key West and on the island that you can use to stick all your stuff in. It makes it super easy to haul your stuff!
Make sure that you have your nightly camping fees in exact cash to pay when you get to the island. When you first get to the island, they will release all day trippers and keep all the campers on the ferry to have a meeting with one of the park rangers. He will go over all the rules and answer any questions you may have. After that, they will release you to get all your gear, which will have already been unloaded onto the dock. Most people will go and get their gear first. Our recommendation is to go and claim a good campsite first. Then get your gear. Like I said above, there are 10 campsites. We got a pretty good one that was secluded and tucked away under some trees. We thought this was great during the day. The downfall was at night, it was hot and we didn't have a lot of airflow. If you really need/want air flow at night, you might opt for a campsite more out in the open, especially where you'd get a good breeze. Below is a map of the island. I added an area in yellow and black that says "CAMPING AREA". These are where the campsites are. The part above the "AREA" would be the area where you'd get the nice sea breeze. Our campsite was right about where the "N" was.


After you get your campsite all set up and organized, now you can go and explore! Don't rush to go do anything. Honestly, we took our time setting up camp and then ate lunch there in our campsite and then ventured out. We swam and snorkeled for a bit and decided to wait to check out the Fort once everyone left. By about 2:30, we had the entire island to ourselves and went and explored the Fort. It's eerily cool to see and explore a HUGE civil war era fort and be the only ones in there. We learned so much history, which was super fun for Michael. He's a huge history buff and loves stuff like that. It was still pretty warm so we decided to snorkel a bit more before supper. We saw so many beautiful fish and coral. The water is SO crystal clear even far out from the land.


For our gear, we brought a tent, an air mattress, 2 battery operated fans (which were a HUGE blessing in 83 degree nights in a tent with little air flow that we got at Walmart HERE. They worked okay for our little tent), cast iron skillet and cast iron dutch oven, camera, GoPro, water bottles, plasticware, and paper plates and bowls, mugs, sheet, blanket and two camp chairs. You don't have to bring your own snorkeling gear, as the ferry provides it for you and you can keep it until you leave the island!
For food, we brought a lot of different items. We brought things like bread and peanut butter, bananas, instant oatmeal packets, granola bars, hot chocolate mix, instant coffee and boxed meals like organic mac n cheese or canned soups. For our first dinner, I made burrito bowls made with boxed yellow rice, a can of black beans, a can of corn, taco seasoning, and then we topped with corn chips and also had tortillas that we could make burritos out of the mixture with. It was delicious, filling, and super easy to make!


And of course we brought stuff for s'mores... How can you camp without one of these??

At night it is SUPER important to make sure ALL food is locked up into the plastic totes and put on top of the picnic table. There are rats on the island that come out at night to look for food. We never saw any or had any issues, but some camp mates at a different camp site said they saw a few, but they looked like cute mice, not like the stereotypical giant rats... As long as your food is put up in the hard totes or coolers, you won't have any issues at all.
Make sure you're out on the beach or on top of the fort for the sunsets. They're beautiful and worth the time to just sit and unwind and relax while watching God's gorgeous creation.


One thing I HIGHLY recommend is to go walk at 3-4am and even grab a blanket and go lay on the helicopter pad and watch the stars. It is AMAZING!!!!! We actually slept there on our second night because it was so much cooler out there in the open. Did I mention that there are NO mosquitoes there? Living in Florida, mosquitoes this time of year or just horrible, so to be on an island and be able to enjoy beautiful views of the stars and not get eaten alive is worth all the money we spent! ;) (Be sure to bring flashlights, but you can only use red lights on the beach during certain times of the year because of turtle nests).


You haven't seen stars until you've seen stars here.... WOW!
You may be able to even see some amazing storms from a distance!


Oh, and don't be afraid when you get to your campsite and see a bunch of these:
And while you're up, you might as well watch the sunrise...


The next morning, you'll still have plenty of time before the next wave of day trippers. We got a good snorkel in and walked around the fort again.
When all the day trippers got there, we went back to our campsite and sat and read for a bit, but as the temperature rose, we decided to find a cooler place. That's when we found a great area in the fort on the second floor where there was a great cross breeze. This became our "secret" place where we would get away and enjoy a cool breeze and we'd sit and read for a couple hours while enjoying the view and sounds of the ocean, while also not being in the sun constantly!

When it's time for your camping trip to end, it's important to have all your gear packed up and ready to go on the dock by 10am the day of your departure. With your ferry ticket, like I said before, you get a free breakfast and free lunch. I suggest you save the free lunch for the day of your departure. All your food will be packed up and stowed away on the ferry. Breakfast consists of fruit, yogurt, cereal, cheese, ham, hard boiled eggs, juice, etc. Lunch is sandwiches (lunch meats and cheeses, PBJ, tuna salad), macaroni salad, chips, fruit, veggies, cookies, and drinks.
By the third day, we were definitely ready for a nice bed, AC and a hot shower, but this trip was one of those things that we will never regret and never forget. I would definitely do it again and I would recommend anyone try it at LEAST for one night!!
For a camping checklist from the Yankee Freedom ferry, go HERE.
For other camping info, go HERE, HERE, and HERE